Difference between revisions of "Visaton ALTO III C"
(→Höhenanpassung) |
(→Höhenanpassung) |
||
| (10 intermediate revisions by the same user not shown) | |||
| Line 1: | Line 1: | ||
| − | == | + | == Short description == |
| − | + | At the moment I just want to deposit some information, not describe everything. | |
| − | + | It is about the ALTO III c , with the newest database values for the chassis and | |
| − | + | the newest version of the Visaton crossover. | |
| − | == | + | == Data == |
| − | ''' | + | '''General''' |
| − | * | + | * Manufacturer:[[manufacturer name]] |
| − | * | + | * Model: |
| − | * | + | * Year of manufacture: |
| − | * | + | * Manufactured in: |
| − | * | + | * Color: |
| − | * | + | * Dimensions (W/H/D): |
| − | * | + | * Weight: X kg |
| − | * | + | * New price approx: |
| − | ''' | + | '''Connections''' |
| − | * | + | * list the connection options here, if known. |
| − | ''' | + | '''Technical data''' |
| − | + | List the technical data here, if known. | |
| − | ''' | + | '''Special equipment''' |
| − | * | + | * here, if available |
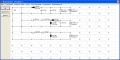
| − | == | + | == Crossover modification/improvements == |
| − | === Original | + | === Original crossover === |
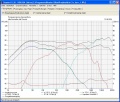
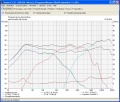
| − | * | + | * phase response between medium and good |
<gallery> | <gallery> | ||
| − | + | File:Visaton Alto III c 001.jpg|Original crossover (version 01/29/2014) | |
| − | + | File:Visaton Alto III c 002.jpg | |
| − | + | file:Visaton Alto III c 003.jpg | |
| − | + | file:Visaton Alto III c 004.jpg | |
| − | + | file:Visaton Alto III c 005.jpg | |
| − | + | file:Visaton Alto III c 006.jpg | |
| − | + | file:Visaton Alto III c 007.jpg | |
</gallery> | </gallery> | ||
| − | === | + | === Height adjustment === |
| − | * | + | * For those it is too brilliant, this adjustment exists. |
| − | * | + | * I tried with suction circle, but did not come up with a conclusive solution. |
| − | * | + | * Therefore this solution in the path. |
| − | * | + | * It's best to put the switches in the back. |
| − | + | Phase response is slightly degraded when old switches are open. | |
| − | + | Each switched on switch causes an improvement of the phase again up to the original of Visaton. | |
| − | + | Amplitude increase possible in 2 half steps from flat to original Visaton. | |
| − | + | When switch S2 is closed, it is again original Visaton, all values from the previous section apply again. | |
| + | Conversion costs: approx. 10,- Euro/box | ||
| + | '''Note:''' | ||
| + | * I would mechanically split the wire strands between 3.3 uF and 0.33 mH. | ||
| + | * And there with wire strands the new parts (S2, 0.15mH, 4.7Ohm, S1, 4.7Ohm) according to the scheme. | ||
| + | If necessary, glue the parts to the switch with construction glue. Basta. | ||
| + | But don't glue the coils to each other, they have to be as far apart as possible. | ||
| + | |||
| + | |||
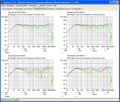
| + | <gallery> | ||
| + | File:Alto III c HA1 2.jpg|Crossover with treble adjustments | ||
| + | File:Alto III c HA1 002.jpg|All switches open | ||
| + | File:Alto III c HA1 003.jpg|S1 closed | ||
| + | File:Alto III c HA1 004.jpg|S2 closed, S1 position doesn't matter | ||
| + | File:Alto III c HA1 005.jpg|All switches open, phase sequence | ||
| + | </gallery> | ||
| + | |||
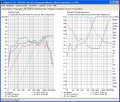
| + | == Operation on amplifiers with only 6 Ohm output == | ||
| + | This question came up. One suggestion was to add a resistor upstream on the speaker. If then 2.2Ohm, so that we come over (6Ohm *80%) 4.8Ohm. | ||
| + | * I don't think this solution is very good. | ||
<gallery> | <gallery> | ||
| − | + | File:Alto III c 6Ohm 1.jpg|2.2Ohm in the speaker cable | |
| − | + | File:Alto III c 6Ohm 2.jpg|The changed frequency response | |
| − | |||
| − | |||
| − | |||
</gallery> | </gallery> | ||
| − | == | + | My tip '''Pay attention''': |
| − | + | ||
| + | These 6Ohm amplifiers are also amplifiers, they also deliver more current with lower impedance loads speak speakers. But these amplifiers heat up faster at 4Ohm, because they are mostly ready-made components that are really designed for a certain current consumption. | ||
| + | |||
| + | Example: | ||
| + | |||
| + | Amplifier 100W/6Ohm nominal data: | ||
| + | Voltage output amplifier when 100Watt at 6Ohm = root(100Watt x 6Ohm)= 24.495 Volt | ||
| + | Current i=u/r = 24.495 Volt / 6Ohm = 4.082 Ampere | ||
| + | |||
| + | Now with a different speaker: | ||
| + | The voltage remains the same with the volume control in the same position: | ||
| + | Current I=U/R = 24.495 Volt / 4Ohm = 6.124 Ampere | ||
| + | Changed power output: P=U x I = 24.495Volt x 6.124 Ampere = 150 Watt | ||
| + | |||
| + | Heating in the amplifier: Most are class AB amplifiers (Rod Elliot amplifiers) with efficiency n=0.7. So | ||
| + | 70% comes on the line, 30% is burned in the amplifier. | ||
| + | |||
| + | Before with 6Ohm loudspeaker there were 30Watt in the final amplifier. | ||
| + | Now with 4Ohm speakers there are 45Watt in the final amplifier. | ||
| + | That is a heat increase of +50%. | ||
| + | |||
| + | And what can you do? | ||
| + | Believe me, these amplifiers are already built to the limit. Observation is probably the easiest thing to do. The best thing to do is to put a thermometer on the cooling fins of the amp. I never touch the fins like that. 40°C as a limit? Because the core temperature of the finished components is much higher. | ||
| + | I don't know a table of values. The best thing to do is to connect the 6Ohm speakers again, full load for 10 minutes and measure the temperature. | ||
| + | |||
| + | Then do the same with the new ones and slowly increase the load until the same temperature is reached. | ||
| + | |||
| + | Finally you will have the same 100 watt output amp. And a mark on the volume control, my new maximum position. | ||
| + | |||
| + | That's all I can think of. But I think you can live with it, if you take it to heart. | ||
| + | |||
| + | == Remarks == | ||
| + | More models of the same series: | ||
| − | == | + | == Pictures == |
| − | == | + | == Test reports == |
== Links == | == Links == | ||
| − | [[ | + | [[Category:Sample Category 1]] |
| − | [[ | + | [[Category:Draft]] |
__NOTOC__ | __NOTOC__ | ||
Latest revision as of 09:01, 15 August 2014
Short description[edit]
At the moment I just want to deposit some information, not describe everything. It is about the ALTO III c , with the newest database values for the chassis and the newest version of the Visaton crossover.
Data[edit]
General
- Manufacturer:manufacturer name
- Model:
- Year of manufacture:
- Manufactured in:
- Color:
- Dimensions (W/H/D):
- Weight: X kg
- New price approx:
Connections
- list the connection options here, if known.
Technical data List the technical data here, if known.
Special equipment
- here, if available
Crossover modification/improvements[edit]
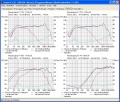
Original crossover[edit]
- phase response between medium and good
Original crossover (version 01/29/2014)

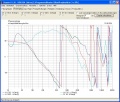


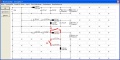
Height adjustment[edit]
- For those it is too brilliant, this adjustment exists.
- I tried with suction circle, but did not come up with a conclusive solution.
- Therefore this solution in the path.
- It's best to put the switches in the back.
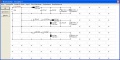
Phase response is slightly degraded when old switches are open. Each switched on switch causes an improvement of the phase again up to the original of Visaton. Amplitude increase possible in 2 half steps from flat to original Visaton. When switch S2 is closed, it is again original Visaton, all values from the previous section apply again. Conversion costs: approx. 10,- Euro/box
Note:
- I would mechanically split the wire strands between 3.3 uF and 0.33 mH.
- And there with wire strands the new parts (S2, 0.15mH, 4.7Ohm, S1, 4.7Ohm) according to the scheme.
If necessary, glue the parts to the switch with construction glue. Basta. But don't glue the coils to each other, they have to be as far apart as possible.
Crossover with treble adjustments

All switches open
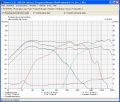
S1 closed
S2 closed, S1 position doesn't matter
All switches open, phase sequence


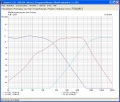
Operation on amplifiers with only 6 Ohm output[edit]
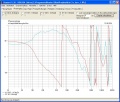
This question came up. One suggestion was to add a resistor upstream on the speaker. If then 2.2Ohm, so that we come over (6Ohm *80%) 4.8Ohm.
- I don't think this solution is very good.
2.2Ohm in the speaker cable
The changed frequency response


My tip Pay attention:
These 6Ohm amplifiers are also amplifiers, they also deliver more current with lower impedance loads speak speakers. But these amplifiers heat up faster at 4Ohm, because they are mostly ready-made components that are really designed for a certain current consumption.
Example:
Amplifier 100W/6Ohm nominal data: Voltage output amplifier when 100Watt at 6Ohm = root(100Watt x 6Ohm)= 24.495 Volt Current i=u/r = 24.495 Volt / 6Ohm = 4.082 Ampere
Now with a different speaker: The voltage remains the same with the volume control in the same position: Current I=U/R = 24.495 Volt / 4Ohm = 6.124 Ampere Changed power output: P=U x I = 24.495Volt x 6.124 Ampere = 150 Watt
Heating in the amplifier: Most are class AB amplifiers (Rod Elliot amplifiers) with efficiency n=0.7. So 70% comes on the line, 30% is burned in the amplifier.
Before with 6Ohm loudspeaker there were 30Watt in the final amplifier. Now with 4Ohm speakers there are 45Watt in the final amplifier. That is a heat increase of +50%.
And what can you do? Believe me, these amplifiers are already built to the limit. Observation is probably the easiest thing to do. The best thing to do is to put a thermometer on the cooling fins of the amp. I never touch the fins like that. 40°C as a limit? Because the core temperature of the finished components is much higher. I don't know a table of values. The best thing to do is to connect the 6Ohm speakers again, full load for 10 minutes and measure the temperature.
Then do the same with the new ones and slowly increase the load until the same temperature is reached.
Finally you will have the same 100 watt output amp. And a mark on the volume control, my new maximum position.
That's all I can think of. But I think you can live with it, if you take it to heart.
Remarks[edit]
More models of the same series: